The 'Flipper' has been DISCONTINUED & is now the Flexible Partial Denture
The Partial is such a superior product...it would be a disservice to offer a 'Flipper' next to our PARTIAL
Dental Lab Direct announces that Flexible Partial Dentures are now available OVER THE INTERNET for $390, for individuals with a need for a space to be filled where a tooth once was. These are worn by those especially with multiple teeth missing.

Watch the video on how to make your own impressions!
This is an actual customer's models:

.....and this is what the Flexible Partial will look like when it is placed on the model:

Partial dentures, are mainly used in the interim during bridge work. These are an excellent solution for making it appear that you're not missing any teeth! The Partial comes with ONE tooth...
Additional teeth are only $25 each...
BUY FLEXIBLE PARTIAL HERE
ADD TOOTH HERE
Actual Customer Testimonial:
BEFORE
AFTER

Monday, July 26, 2010 11:27 AM
"I had lost three front teeth in a accident just weeks before my daughters wedding. This was to be a large formal wedding and giving away my daughter with three missing front teeth was out of the question. I went to my dentist and he told me that he could not have a temporary bridge ready before the wedding and the cost for a "temperary bridge" was extremely high. I fortunately found neon brite and contacted Rob. I was skeptical and had a lot of questions but Rob assured my that they could do it and in time for the wedding. What amazed me was that every time I emailed Rob width a question he got back to me almost immediately. Well, long story short, he came through. The flipper arrived before the wedding as promised and it looked great. My wife stood inches from me and said you could never tell they were not my own teeth. Thankyou again Rob best to you.
Sincerely,
Robert Taylor., London OH
The flexible framework RPD's
The most recent advance in dental materials has been the application of nylon-like materials to the fabrication of dental appliances. Nylon generally replaces the metal, and the pink acrylic denture material used to build the framework for standard removable partial dentures. Nylon is similar to the material used to build those fluorescent orange traffic cones you sometimes see on highways. It is nearly unbreakable, is colored pink like the gums, can be built quite thin, and can form not only the denture base, but the clasps as well. Since the clasps are built to curl around the necks of the teeth, they are practically indistinguishable from the gums that normally surround the teeth. Brands of this type are: Luciton FRS, Sunflex, TCS, Duraflex, Valplast, and Flexstar.

Our type of flexible partial denture base uses a vinyl composite instead of nylon. The most commonly sold brand is Flexite. A second brand Is Ultraflex. These materials are also flexible and can be built with tooth or gum colored clasps. Ultraflex even comes in a clear variety. Unlike nylon partial dentures, they are much easier for the dentist to adjust making them a much more "user friendly" denture base.
Even though this type of denture does not rest on the natural teeth like the metal framework variety, the clasps rest on the gums surrounding the natural teeth. This tissue, unlike the gums over extraction sites, is stable and changes very little over time which keeps these RPD's stable and unchanging similar to the cast metal variety. This type of partial denture is extremely stable and retentive, and the elasticity of the flexible plastic clasps keeps them that way indefinitely.
Using the Flexible Partial/dental flipper is the cheapest way to replace missing teeth. It can be used as a temporary option when you are waiting for a permanent dental bridge or when you are waiting for the dental implant to be healed.
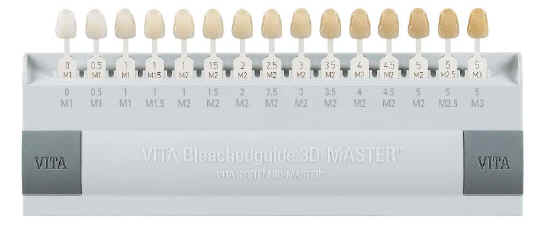
The Partial is manufactured from a nearly indestructible acrylic after taking the impression of the mouth and then the plaster cast is made. The cast is then used to manufacture the appliance with the shade of the tooth selected (shown below) . The acrylic tooth & pink plate will be molded to fit inside the tongue with a tooth that matches other teeth in the mouth. In most cases the color chosen is one (1) of the first three (3) shades...A1, A2, or A3. If unsure, choose the lighter shade and purchase some tooth whitener for your natural teeth:

BUY WHITENING GEL HERE
Even if the Partial is meant to be used on temporary basis, certain people may choose to have it semi-permanently, but since it presses on the gums it's not the best option as far as caring of your mouth.
The dental Flipper/Flexible Partial is the fastest way of replacing a missing tooth. The cost of the dental Flipper depends on the quality you want. A Flipper formed by a qualified cosmetic dentist can cost up to $1500. Most don't care to pay that amount for something temporary, which is why ours is only $390 FOR THE SAME EXACT THING!...some may wait until they can get a permanent solution. However if your tooth is missing where it can affect your smile and appearance, you can part with the money. Aside of the appearance, sometimes the missing tooth can create a discomfort meaning you need a pontic.
Many people may also choose the dental Flipper or Flexible Partial Denture when they fear to undergo oral surgery. Normally, people can wait up to 6 months if in need of an implant. For many, this can be scary and costly, but compared to the flipper is a permanent solution. Implants are also a good option for gum line solution versus using a dental flipper...but implants are prohibitively expensive!
If you still have some problem concerning the Partial then you can ask your dentist the options they have and how much you should pay for them. Always to keep in mind that the Flipper/Partial Denture should be considered a temporary solution and not permanent one.
Bridge work can be very expensive and take time...
How much do dental bridges cost?
The average cost of a single fixed bridge depends on many factors, from which region you're in to how many and which type of bridges are needed. Typically, a dental bridge cost ranges from $500-900 per tooth. Dental insurance sometimes pays for about half. NOTE: This is a cost per tooth in the bridge, and doesn't include the costs for any anchoring crowns on either side of the bridge.
In the case of a Maryland type bridge, costs range from $250 to $550 for each attaching wing and $600 to $1200 for each false tooth.
Advantages of dental bridges:
Bridges are natural in appearance, and usually require only two visits to your dentist. If you maintain good oral hygiene, your fixed bridge should last as many as ten years or more.
Disadvantages of having a dental bridge:
It is common for your teeth to be mildly sensitive to extreme temperatures for a few weeks after the treatment. The build up of bacteria formed from food acids on your teeth and gums can become infected if proper oral hygiene is not followed.
Personal Stories: Dental Bridges
I turned forty last year, and have enjoyed playing softball since I was a kid. One drawback to the sport is the occasional hit from a ball. Several years ago I lost two teeth from such a mishap, and had worn a partial. I found the partial to be a bit embarrassing at my age, but my dentist had discussed no other option with me.
Frustrated that I was stuck with this thing for the rest of my life, I started doing some research, which was hard to come by. And when I did discover information on alternatives, I didn't understand it. As many of you who are now visiting this site already know, such matters are not easy to speak with family or friends about. After visiting this site, I soon understood that I had a few options to remedy the spaces in my mouth.
I located a Certified Cosmetic Dentist and discussed these options, including the fact that I wanted to avoid the more costly procedures, such as implants. His immediate solution was placing two bridges.
Because it takes time to get the bridgework complete I used a flipper in the interim. Rob, thanks for the site!
Jerry B., New Hampshire
BUY FLEXIBLE PARTIAL HERE
Here's how it works:
When you receive your kit, WATCH THE VIDEO first. Then take out a set of the YELLOW & BLUE impression material (putty).

Mix the two pieces of putty together for 45-65 seconds just to get one solid BLUE color (warmer areas may set faster)

When your putty is one solid color, roll it & shape it like a finger. Pick up your tray.

Put the finger shaped putty into the tray, making sure to cover all parts of the tray.

Take the tray and place it over the center of your upper or lower teeth (REMEMBER: this putty will begin to harden in under TWO (2) minutes). Push the tray over your teeth. Hold for five minutes, then remove.
Send your impressions back to our dental lab using the pre-paid envelope that came with your kit. We make your custom mouthpiece(s) & mail it back to you, EASY!
BUY FLEXIBLE PARTIAL HERE
Determining the color for your flipper?
When considering partial dentures a common question is how white the tooth should be. Usually, the answer is to whiten your natural teeth to either the level of whiteness you want or to the brightest they can be. Your cosmetic dentist will then have the dental bridge made to that color. Teeth are of course not monochromatic, so typically more than one color is used to create a very natural look. This color variation is critical in avoiding fake or artificial looking teeth. It is the internal contrast of colors that help create vitality. The internal play of light on the porcelain in the restoration helps to create this vitality. Surface texture is also very important, and helps to break up light reflections and make the dental bridge look more natural. Depending on the type of dental bridge you're considering, it's important that the crowns anchoring the bridge match both the dental bridge and the color of your natural teeth.
There is no one standard system in the dental field to measure and determine tooth color. The most often heard about, however, is the Vita shade guide. This guide divides tooth color into four basic shade ranges:
A (reddish brown)
B (reddish yellow)
C (gray)
D (reddish gray).
In the A range there are five levels of darkness. Ranges B, C and D, each have four levels.
Not all of your teeth are the same natural color. Usually your eye teeth tend to be darker than the others, your front teeth are typically the whitest, and molars tend to be a shade between the two. The goal for everyone is to achieve their individual optimum whiteness while still looking natural.
Most dentists will show you a shade chart (like the above mentioned Vita Shade Guide) for you to pick from. Keep in mind, with a good cosmetic dentist this is merely a starting point. Other considerations when determining the color of dental bridges for each patient are your complexion, hair color, the color of your natural teeth and even your eye color.
Dental Bridge Basics
A bridge created by a cosmetic dentist is completely metal-free. As a result, the bridge absorbs light, creating a natural looking smile. (Bridges made of porcelain fused to metal actually reflect light, creating an "unnatural" look for the tooth or teeth.)
Description of Procedure:
A dental bridge (or pontic) is a custom-made false tooth or teeth, that is permanently placed between two healthy teeth, filling in the area left by a missing tooth or teeth. The bridge is held in place by porcelain crowns placed on the healthy teeth on each side of space to be filled. Partials & Flippers are used in-between visits to the dentist for the final bridge work.
Bridges reduce the risk of gum disease, limit the shifting of remaining teeth, help correct some bite problems and help improve speech.
BUY FLEXIBLE PARTIAL HERE
How It's Done
The dentist will first administer an anesthetic to numb the area. Then, a minimal amount of tooth structure will be removed from the teeth on either side of the space to be filled by the new tooth or teeth. This material is removed to provide the needed space for the new crowns.
An impression of the area will be made. This impression will be sent to a dental laboratory, serving as a model from which the bridge will be created.
The patient will need a flipper to get them through to the next appointment. The bridge will then be fitted and adjusted for fit and comfort and bonded to the teeth.
Recovery Expectations:
Both the preparation and placement of the temporary bridge as well as the bonding of the permanent bridge may cause some minor tenderness in the area. Ibuprofen can reduce the symptoms.
Complications:
There are no known complications associated with the use of a bridge.
Am I a Candidate:
If you have a missing tooth or teeth, you may be a candidate for a FLEXIBLE PARTIAL (sometimes referred to as a 'flipper)
Cost:
The cost of a PARTIAL is only $390 and additional teeth are only $25 each.
We suggest whitening your natural teeth to the whitest shade possible before bridge work.
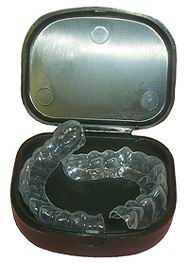
Dental-Lab-Direct™ Whitening Trays
Our Professional Tooth Whitening System consists of customized whitening trays (made of a thin flexible plastic to fit your teeth exclusively) and three (3) syringes of 22% tooth whitener Carbamide Peroxide tooth whitening-gel. We construct the whitening trays from the impression trays and putty contained in our “kit”, that you make and ship back to our lab.
Upon receiving your Custom Professional Tooth Whitening Trays, a very small amount of tooth whitening gel from a pre-loaded gel-syringe are placed into them, and then placed over teeth. The trays are worn for thirty minutes to an hour, depending on sensitivity.
Trays are worn for the first 5 days, then twice a week to maintain desired tooth whitening. Compare ours versus the dentists versus the OTC (over the counter) type. You’ll easily see the value of Neon Brite’s products and services.
The uses of Custom Professional Tooth Whitening trays are by far the most comfortable. The trays are form fitted, not bulky like the type one boils. They stay in place unlike whitening strips, can be worn anytime, not specifically at night and provide for a more even whitening of your teeth.
Our Tooth Whitening Gel is a 22% tooth whitener Carbamide Peroxide. The boil, strip, & applicator type is only 3-4 % and must be worn much, much longer for the same desired effect.
BUY TEETH WHITENING TRAYS HERE
THIS VIDEO CLIP WILL SHOW YOU HOW:
Today, with the advent of Our Personal Impression Kit, it’s possible to take one’s own teeth impression with detailed step by step photo instructions, usually taking less than five minutes for both the upper and lower teeth. Our kit along with your impressions are then sent via a Postage Paid Envelope to our lab…the same lab local dentists use, yet costing 60-90% less by “skipping” the dentist…eliminating the need for a D.D.S. to fit a professional dental mouthpiece.

© 2003 - 2018 DENTAL-LAB-DIRECT.COM ! All Right Reserved


